Monday, August 10, 2009

Grilled Chicken Quesadillas


Confession: I LOVE Mexican food. I could probably eat it every single day (sometimes I do) and have been known to take down an entire jar of salsa in one sitting. This love is also shared by my boyfriend, Steve, and so when deciding what to grill one night, he suggested quesadillas.

At first I thought that sounded a little tricky, I have enough trouble keeping the cheese inside the tortilla when I'm busting
quesadillas out on my George Foreman. But then I thought of spicy grilled chicken sandwiched between two charred crispy corn tortillas smothered with smokey cheese, and I was in.

This is a great weeknight dinner, it came together pretty quickly with just a one-hour marinade for the chicken. We grilled the chicken with some onions and bell peppers first, then assembled the
quesadillas and threw them back onto the grill. The combinations are endless, but whatever you put inside, it beats any quesadilla made in the oven or on your Foreman any day.

Grilled Chicken Quesadillas
(makes 4-6 medium sized
quesadillas depending on how much filling you use)

2 boneless skinless chicken breasts

Marinade
2-3 Tablespoons
adobo sauce (from a can of chipotle peppers in adobo, reserve the rest for later use, or freeze)
juice of one lime

2-3 cloves garlic - minced
handful of
cilantro - chopped
salt and pepper
Olive oil (just enough to thin out sauce enough to coat chicken, probably 1/4 cup or less)
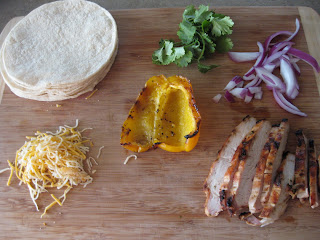
8-12 Corn tortillas
Cheese (I used one package of
Mexican blend shredded cheese, because that is what was on sale)
Cilantro Leaves (about 1/2 cup)
Bell Pepper
Red Onion
Olive oil (to brush the tortillas with)

Put chicken breasts and marinade ingredients into
ziploc bag and mush it around to coat. Place in refrigerator for 30 minutes to an hour while you prep the rest of the meal.

Pre-heat your grill for medium-high direct heat.

Chop the bell pepper in half or quarters and the onion into thick rings. If you keep the pieces big enough you can put them directly on the grill. If you have a veggie basket, feel free to chop the veggies smaller. Toss with
olive oil and salt and pepper.

Grill the chicken for 20-30 minutes (depending on the size of your chicken breasts) until no longer pink in the center. When the chicken is just about done, throw the veggies on over direct heat until cooked through. Remove from grill and put the cover back on the grill.

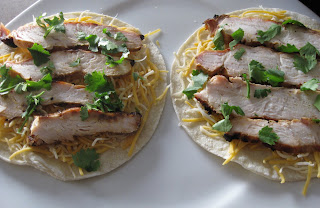
Let the chicken and veggies cool just enough to handle, then slice them thin. Assemble the quesadillas with cheese, chicken, cilantro leave, and veggies (and whatever else you feel like throwing on there).

I try to make sure my first and last layers are both cheese, so that it melts and traps all the meats and veggies inside. the tortillas, reducing your chances of spillage.

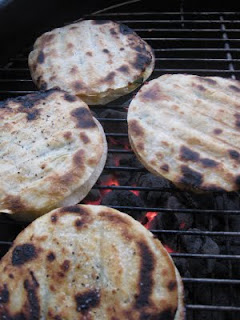
Once your quesadillas are assembled, brush the top tortilla with olive oil. This will help it to not stick to the grill, and also help it crisp up very nicely.

Take the assembled
quesadillas out to the grill, and, moving quickly and gently, flip your quesadillas onto the grill using two hands so that the oiled side is down. The faster you go, the less time the fillings have to fly out. It has something to do with gravity I'm sure but let's not get into that here. Brush the tops with olive oil, and after 2-3 minutes flip the quesadillas over using a large spatula, again do this quickly. The cheese should now be metled so they should be a bit more cohesive and easier to manuver.

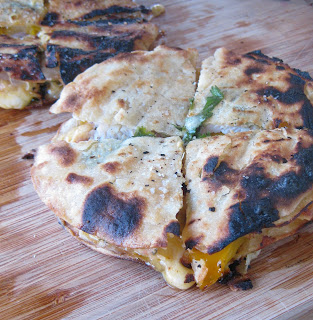
When the bottom is crisped up and the cheese is fully melted take them off the grill and let them rest for a minute or two to let the cheese cool a bit.

Cut into quarters and serve with salsa, sour cream, hot sauce, and any other fixings you see fit.

Marble Rye Bread


Well it has been a little while since I have posted on here. You would think getting laid off would give me more time to update my blog, but alas, it turns out I am kind of lazy and have mostly been laying on the couch for the past week. I figured after the stress of my last job, I deserved a bit of time off from the real world before I dug back in. Now its time to start getting some stuff done around the apartment, and oh yeah, time to start finding a real job.

I will however, be making my foray into the restaurant world in a few weeks...as a hostess at a swanky new bar that is opening up downtown on Michigan Avenue. I have never done any hosting/server/waitressing before so needless to say, this should be interesting. In my free time I plan on working on my portfolio, looking for a 'big girl' job, cooking, and working on my blog and photography. I am actually quite excited at this break from the real world for a little while, although I am sure that will wear off once I realize I am broke.

A few weeks ago I dove a little deeper into my bread making adventures, and figured this would be a good first post, as an unemployed food blogger. It was cheap, easy, and makes for great freezer food. This marble rye bread is great for sandwiches, toast, or cubed and toasted for croutons. Although it may look a little complicated, it was actually quite simple, not to mention forgiving when I was pinched for time.

Marble Rye Bread
Adapted from A Bread A Day (adapted from Peter Reinhart's A Bread Baker's Apprentice)
My notes in Green

Makes 2 Loaves

Light Rye Ingredients:

1 1/2 Cups Rye Flour
3 Cups unbleached Bread Flour (Or 3 cups minus 3 tablespoons all purpose flour, plus 3 tablespoons vital wheat gluten)
1 1/2 teaspoons salt
1 3/4 teaspoons instant yeast
1 1/2 teaspoons caraway seeds
1 1/4 cups plus 2 tablespoons room temperature water
1 tablespoon molasses
2 tablespoons olive oil

Dark Rye Ingredients:

1 1/2 Cups Rye Flour
3 Cups unbleached Bread Flour (Or 3 cups minus 3 tablespoons all purpose flour, plus 3 tablespoons vital wheat gluten)
1 1/2 teaspoons salt
1 3/4 teaspoons instant yeast
1 1/2 teaspoons caraway seeds
1 1/4 cups plus 2 tablespoons room temperature water
1 tablespoon molasses
2 tablespoons olive oil
2 tablespoons cocoa powder dissolved in 2 tablespoons water

The recipe calls for making and kneading the dough in a stand mixer, but since I do not have one, I usually start my dough in a food processor with the dough blade, and finish it on the counter, kneading it by hand.

For the light rye:

Combine the flours, salt, yeast, and caraway seeds in the bowl of the food processor and pulse a few times to combine. Add the water, molasses, and olive oil. Pulse until wet ingredients are incorporated, scraping down the bowl as necessary. Turn out dough onto flour surface (the dough will probably be pretty shaggy and falling apart at this point) and knead until it forms a cohesive, elastic ball - about 8-10 minutes.

Place the dough into a lightly oiled bowl and cover with plastic wrap.

For the dark rye:

Repeat same steps as the light rye, this time adding in the cocoa power with the rest of the wet ingredients. Place dough in a second oiled bowl and cover with plastic wrap.

Let the doughs rise until doubled in size, about 90 minutes.

Working with one of the doughs at a time, turn out onto floured surface and press gently to deflate. Divide each dough into 4 equal pieces. Gently shape each piece into a ball and flatten slightly. Cover each piece with plastic wrap and let sit for 15-20 minutes.

Working with once piece of dough at a time, keeping the others covered in plastic wrap, roll out dough on a floured surface into a oval shape (about 5 x 8 inches). Repeat with remaining dough pieces and stack them, alternating light and dark, into two stacks of four layers.

Roll each stack up, jelly roll style, tightly pressing the dough together as you go. Place each roll into a lined loaf pan (I used small sil-pats in my loaf pans, but you can use parchment paper as well) seam side down so it doesn't come undone.

You can also place the dough onto lined baking sheets for a more rustic look. Cover loosely with oiled plastic wrap and let rise for 60-90 minutes until nearly doubled in size.

At this point I had a concert to go to (I got started on this project a little late in the day) so instead of letting the dough rise at room temperature, I let is rise for a few hours in the fridge and let then come to room temp before baking them off. They still turned out just fine.

Bake at 350 degrees on the middle rack for 40-45 minutes until deep golden brown. Let the bread cool for at least 1-2 hours before slicing.

I highly recommend making panini sandwiches with this bread, heavy on the Dijon mustard. Luckily my boyfriend doesn't like rye bread, so I have two loaves all to myself. Okay...there is only one loaf left. Enjoy!

Heather's Squishy Buns


As I add more and more recipes to this blog, you will soon figure out that I am not a huge sweets person. I live for appetizers and savor the main course, but you will almost never find me first in line at the dessert table. For breakfast, you can feed me eggs and bacon until I pop, but I can usually pass on the doughnuts and danishes. Its not that I hate sweets, I usually just prefer more savory treats in my tummy.

This is not to say I cannot appreciate a great pecan roll once in a while, and boy, these are GREAT pecan rolls. They are actually Ina Garten's Easy Sticky Buns, and my good friend Heather made them last weekend at the cabin. I was of course there with my pastry brush and melted butter, providing moral support and and extra hand. She needed that hand, not because she needed help in the kitchen or help with the recipe, but because we were at a cabin and she was sitting cross-legged on the floor, assembling pecan rolls at 8:30 in the morning.

Frozen puff pastry makes these rolls an absolute breeze (even on the floor). Unroll the pastry, sprinkle on some goodies, roll it up, cut it up, put into muffin tins, and presto, you have pecan rolls. Heather's turned out a little tall for the muffin tin we had, so like any great chef, she improvised and made them fit. They were promptly renamed 'Heather's Squishy Buns', and that is what they shall be called henceforth.

'Heather's Squishy Buns'
Adapted from Ina Garten's Easy Sticky Buns
My notes in green

1 package frozen Puff Pastry (17.3 ounces, 2 sheets - defrosted)

1 1/2 sticks unsalted butter (room temperature) - if you forget like we did, just set them on top of a warm stove for a few minutes, or put them in the pockets of your apron as you prep the rest of the items
1/3 cup light brown sugar
1/2 cup pecans - chopped or whole, your call

2 tablespoons unsalted butter (melted and cooled)
2/3 cup light brown sugar
3 teaspoons ground cinnamon
Here she calls for raisins...but Heather made the executive decision to omit, I backed this decision. If you want, add 1 cup of raisins.

Preheat your oven to 400 degrees. Place a 12-cup (or two 6-cup) muffin tins onto a parchment paper-lined sheet pan. There is a good chance that they will boil over, so this step saves some cleanup time.

Combine the 1 1/2 sticks of butter and the 1/3 cup of brown sugar together in a bowl. - Ina calls for doing this in a stand mixture, but there really is no need. As long as your butter is soft, a fork and a bowl is all you need to mash these two ingredients up together. Just ask Heather.

Place 1 tablespoon of this mixture into each of the muffin cups, and then evenly distribute the pecans among the 12 cups, on top of the butter and sugar mixture.

Lightly flour a wooden surface - or glass, or plastic, or 30 year old linoleum counter tops, whatever you have available to you - and unroll the puff pastry dough. Brush each pastry with melted butter, leaving a one inch border on all sides. Sprinkle each sheet with 1/3 cup brown sugar, and 1 1/2 teaspoons of cinnamon - and raisins if you are so inclined...we were not.

Starting at one end, roll up pastry snugly, jelly roll style, and place seam side down.

Cut each roll into 6 even pieces and place one piece into each muffin cup, spiral side up.

This is where things got a little squishy. They were sticking up quite high so we did what any hungry, slightly hungover, unsure cook would do. We squished them down until they looked about even and stuck them in the oven.

30 minutes later, take them out, let them sit for just a few minutes, then turn them over onto a plate and let the gooey, sticky, goodness runeth over.

Tuesday, August 4, 2009

Ribs, Potatoes, and a Power Outage


And the cabin fun continues.

Way back in February, at the last Cabin weekend, my friend's husband declared that he wanted ribs at the summer cabin weekend. Being that I am the one usually in charge of the big dinner at said cabin weekends, I was the one to make his decree a reality.

I knew exactly what I was going to make, My Dad's Ribs. My parents are exceptional cooks, and my Dad is a master at his grill. He has been perfecting his rib strategy for years and I figured it was time for me to learn how to make them myself, and learn from the best. (I promise I am not just sucking up so they will cook me dinner when they come to visit in two weeks, I swear)

After a few email exchanges of recipes, a few phone calls containing conversations such as:

'well how much mustard powder do I use for 5 racks of ribs?'
'I don't know, whatever looks right'

I had my plan, and a fairly vague recipe. I also had to tell myself to trust my instincts and to just go with it. So I went.

My Dad says that he got the original recipe form an article in the Minneapolis Star Tribune newspaper about a decade ago and has been changing and tweaking it ever since, therefore I have no clue how close the current recipe is to the original. What I do know is that it is the perfect mix of sticky, sweet, spicy, and savory, all grilled to absolute baby-back rib perfection. Served with roasted potatoes, sweet corn, and an Asian slaw (post to come), it was a summer meal to remember.
Even after all the planning that was put into this meal, there of course was a kink. The ribs were in hour-6 on the grill, the potatoes had just been put in the oven to roast, the first round of corn was just starting to boil on the stove. The sun was starting to set over Moose Point Lodge, tummies were starving, and then, the power goes out. Crap.

We went into crisis mode for a few minutes until I could think about what the heck I was going to do with two sheet pans full of raw potatoes and half cooked corn on the cob. Everyone offered their help and between the ten of us were ably to pull of this meal, even in a dark kitchen with no oven. Luckily we had a grill. I took the ribs off the grill, wrapped them in foil and put them into the warm oven. The potatoes went onto tin foil sheets onto the grill where they roasted for about another 45 minutes.

The corn hung out in the hot water and actually finished cooking. I rigged a lantern to hang from the kitchen cabinet and mixed up the coleslaw. Everything was still shockingly warm when we finally sat down to eat in the porch with candles and lanterns burning away. It was quite romantic. There were almost no leftovers so I can safely assume everyone enjoyed the dinner, and I did hear someone say "screw Famous Daves" at one point during the meal. I will take that as a compliment.

Dad's 3-2-1 Ribs
Adapted from the Minneapolis Star Tribune

I used 5 racks of baby back ribs for this, and I had the butcher cut them in half for easier handling. The measurements for the brine and the rub are nowhere near exact, but that's okay. Put in a little more of what you like, a little less of what you don't, and the ribs will be perfect for your taste buds. The 3-2-1 title refers to the time (in hours) spent on the grill in various ways: 3 hours on the grill, 2 hours wrapped in foil with liquid to steam, and 1 hour back on the grill bathing in sauce. It seems like a lot of work, but it is so, so worth it.

Brine
One handful kosher salt
One handful brown sugar
a few tablespoons of dried thyme, dried rosemary, black peppercorns, garlic powder, powdered ginger
3-4 crushed bay leaves

Put into 2 gallon Ziploc bag with ribs and add water until the ribs are covered. Let sit refrigerated overnight.

Rub
You can make as much of this as you want, put what you need on the ribs and save the rest for a later use.

2 parts onion powder
2 parts garlic powder
2 parts paprika
1 part powdered ginger
1 part hot mustard powder (or regular mustard powder, just add a little extra cayenne if you like it hot)
1 part thyme
1 part rosemary
1 part freshly ground black pepper
1/2 part salt
1/2 part cayenne
1/4 part cinnamon
1/4 part nutmeg

Mix all ingredients together, put in an airtight container until ready to use.

Sauce
3 cloves of garlic
2 inch piece of ginger
1 tablespoon of Siriacha (Asian chili paste)
1 cup raspberry vinegar
1 cup honey
1/2 cup soy sauce (I used gluten-free tamari)
1/2 cup Dijon mustard
1 cup olive oil

Puree garlic and ginger in food processor until it forms a paste. Add chili paste, vinegar, honey, soy sauce, and mustard and pulse to combine. Then, stream in the olive oil while processor is running to emulsify. Pour into saucepan and simmer over low heat for about 15 minutes until the sauce thickens just a bit. This can be made in advance, refrigerated, and reheated before applying to ribs.

When you are ready to start cooking, take the ribs out of the brine, and rinse well under cold water, making sure to get all the excess salt and herbs off the meat. Pat dry with paper towels and sprinkle the rub over one side of the meat. Let sit for a minute or two and then rub into meat with fingers or a fork. Flip ribs over and repeat. Let the ribs rest at room temperature while you prepare your grill.
Preheat your grill to high, and set up for indirect grilling. If you are using gas, turn the front and back burners on and leave the center burner off. If using charcoal you can put a drip pan in the center and arrange the coals on either side of the drip pan. When the grill gets hot, clean the grates and lower the temp until it hits 225-275. This is where the temperature should stay for the next 6 hours. Place your ribs on the grill over the center burner that is off, or over the drip pan, close the lid, and leave them alone.

Note: I prefer to use charcoal, but if like me, you find yourself cooking ribs at a cabin with only a gas grill at your disposal, it is possible to still get nice smoke flavor. Place some soaked wood chips (I used apple wood here) into a large piece of tin foil and wrap into a packet. Poke holes all over with a fork (including the bottom) and toss it onto an unused part of your grill.

Also, I had a ton of ribs and a very small grill. In order to keep all of the ribs over indirect heat, I had to stack them on top of each other. Since these are being grilled for such a long time, it doesn't really affect it too much, as long as you swap the ribs, bottom to top and vice-versa every 45 minutes or so. Note that this may add a bit to your cooking time since you are opening the grill more often and letting all the heat out.
After the ribs have been on the grill for three hours, it is time for stage two. For the next two hours, the ribs will basically steam on the grill, to make them absolutely tender and moist. Take the ribs and place them in a large sheet of HEAVY DUTY tin foil. Mold the tin foil up around the sides so as not to let any liquid leak out. Pour about a cup or two of chicken broth, beer, or cola (water is fine as well) into the bottom of the foil, and cover and seal with another sheet of foil. Now go have another beer (or go for a spin on the pontoon like I did).
Two hours later, it is time for the final stage. Take the ribs out of the tin foil and put them back directly on the grill, over indirect heat (the same as stage one). This time though you will be liberally applying the sauce every 15 minutes or so for one hour, until the ribs are almost falling off the bones, and are smelling heavenly.

Take the ribs off the grill, wrap them back in foil and let them rest for at least 15 minutes before eating and enjoying.

Go ahead lick your fingers, you know you want to.

Monday, August 3, 2009

Let's do dessert first, ok?


Ah...cabin weekend. My favorite time of year. A few of my best friends and I, (whom I don't get to see that often) and our significant others get together twice a year at a cabin in northern Wisconsin. It is a weekend filled with bonfires and pontoon rides, lawn games and beer, hot-tubbing and trips to the corner bar, but most of all, it is a weekend with lots of laughs, and lots of food. Each couple takes a meal throughout the weekend, and somehow I always get volunteered for the Saturday night dinner. Not that I am complaining of course, but it definitely takes an extraordinary amount of planning to be able to pull off a nice meal for ten people in the kitchen the size of a closet (not to mention a power outage, but more on that in later posts). All of the food this weekend was amazing, although I have such wonderful friends, that I think they would smile and ask for seconds even if it tasted like a shoe.

There will be many posts to come telling you about the actual meal that I made, and the meals that my friends made, but I think my crowning achievement of the weekend (besides the ribs) was that I, Bria, made a cake. And it was good. And it was gluten-free.

I have been lusting over a cake that was on the cover of Bon Appétit for about four years now, and since two of the cabin attendees had birthdays in the last week, I thought it was the perfect opportunity to make it. The only problem was that one of said birthday girls has celiac disease and is allergic to gluten. No fear, Whole Foods gluten-free baking mix to the rescue! I was a bit worried at first, but it was surprisingly easy to find gluten-free substitutes that I could swap into the cake so that everyone could enjoy it. The cake was a bit heavy and dense from the gluten-free flour, but it was still very sweet and delicious.

Okay let's get to the good stuff. I followed the recipe exactly, except for the flour and baking power gluten-free substitutions which I made notes of in the recipe below. Normally I like to mess with recipes and make them my own, but not when it comes to baking. If I had strayed I probably would have ended up with something more resembling a cinder block than a lemon cake. There are four main components to this cake: the cake layers, the lemon curd, the frosting, and the pistachio crunch. To make life easier on myself, I made one of these components each night last week and they all kept beautifully until Saturday when it came time to assemble the cake. The whole recipe can be found at Epicurious, and here is my Gluten-Free adaptation, broken down into each day, making it much more manageable:

Gluten-Free Lemon Pistachio Crunch Cake
Adapted from Bon Appetit 2004
(my notes in green)

MONDAY
Kicking off the week of prepping for the weekend, I decided to bake the cakes and freeze them. I triple wrapped them in plastic wrap and placed them each on a flat surface in the freezer until they were completely frozen, at which point they could be stacked. I also saved the 8 egg yolks to use them for the lemon curd, they can be placed in a Ziploc container and will be fine in the refrigerator for a few days.

Cake
3 1/2 cups Gluten-Free Baking Mix (I used the 365 brand from Whole Foods)
4 teaspoons Gluten-Free baking powder (also the 365 brand from Whole Foods)
3/4 teaspoon salt
1 1/4 cups unsalted butter, room temperature (2 1/2 sticks)
2 cups sugar, divided
1 tablespoon vanilla extract
2 teaspoons lemon zest (I accidentally read this as tablespoons, but I think a little extra lemon zest never hurts)
1 1/2 cups whole milk
8 large egg whites

Preheat oven to 350°F. Butter and flour three 9-inch-diameter cake pans with 1 1/2-inch-high sides. Sift flour, baking powder, and salt into medium bowl. Using electric mixer, beat butter in large bowl until fluffy. Gradually add 1 3/4 cups sugar, beating until well blended. Beat in vanilla and lemon peel. Beat in flour mixture alternately with milk in 3 additions each. Using clean dry beaters, beat egg whites in another large bowl until soft peaks form. Gradually add remaining 1/4 cup sugar, beating until stiff but not dry. Fold whites into batter in 3 additions. - this stage was a little touch and go, I believe the gluten free mix made this batter VERY thick, as in almost bread dough thick. I double and triple checked that I was following the recipe correctly, which I was, so I think If I ever make gluten free cake again, I will add a bit more liquid to the batter.

Divide batter among prepared pans -if yours is thick make sure to smooth it out with a spatula to get an even top. Bake cakes until golden and tester inserted into center comes out clean, about 25-30 minutes.

Cool cakes in pans on racks 15 minutes. Cut around pan sides and turn cakes out onto racks. Turn cakes right side up and cool completely. At this point you can freeze the cakes if you are keeping them for more than a day or two before assembling.


TUESDAY
The lemon curd was made and stored in a Ziploc container with a piece of plastic wrap pushed down onto the surface to make sure no air would get to it.

Curd
8 large egg yolks
3/4 cup sugar
1/2 cup fresh lemon juice
1/2 cup unsalted butter (1 stick)
2 tablespoons lemon zest
1/8 teaspoon salt

Whisk all ingredients in heavy medium saucepan to blend. Cook over medium-low heat until curd thickens and candy thermometer registers 170°F, stirring constantly, about 7 minutes (do not boil). I did not use a candy thermometer for this, but I did use a double boiler instead of heating it directly in the saucepan so that I wouldn't have to worry as much about it burning or curdling.

WEDNESDAY
The frosting requires that you make a base, chill overnight, and finish the next day. I made the base of melted white chocolate and cream and left it to sit in a Ziploc container overnight. I also made the pistachio crunch, chopped it up and put it into a Ziploc bag and into the fridge.

Frosting
2 1/2 cups chilled whipping cream, divided
8 ounces high quality white chocolate (for gluten-free, make sure there is no wheat in the ingredient list, I used Ghirardelli)
1/8 teaspoon salt

Bring 3/4 cup cream to simmer in heavy medium saucepan. Remove from heat. Add chocolate and salt; stir until smooth. Transfer frosting base to bowl. Cover and chill overnight.

Pistachio Crunch
2/3 cup sugar
1/4 cup unsalted butter (1/2 stick)
1/4 cup water
1/2 teaspoon baking soda
1 cup unsalted pistachios (if you can't find unsalted, rinse them off and roast them for a few minutes to dry them out)

Place large sheet of foil on work surface; butter foil. Combine sugar, butter, and 1/4 cup water in heavy medium saucepan. Stir over medium-low heat until sugar dissolves and butter melts, occasionally brushing down sides of pan with wet pastry brush. Increase heat to medium-high and boil until syrup is medium amber color, stirring constantly, about 12 minutes.

Remove from heat. Immediately add baking soda (mixture will foam up), then the nuts and stir to blend well. Spread nut mixture onto prepared foil, separating nuts. Do these last few steps VERY quickly, it sets in about 10-20 seconds.

Cool completely. Chop crunch into 1/4- to 1/3-inch pieces, and store in air-tight container.

THURSDAY
All I had left to do at this point was finish the frosting. I packaged the frosting the same way as the lemon curd. The frosting just required a little whisking to firm up prior to putting it on the cake.

Whisk remaining 1 3/4 cups chilled cream into frosting base to loosen. Using electric mixer, beat until frosting holds stiff peaks. Put into airtight containers until ready to be used.


SATURDAY
Saturday was cake eating day! Time to assemble the cake!

Using serrated knife, cut off mounded tops of cake layers to level. Place 1 cake layer on platter, trimmed side up. Spread with half of lemon curd. Top with second cake layer, trimmed side up. Spread with remaining lemon curd. Top with third cake layer, trimmed side down.

At this point I crumb-coated the cake with a small amount of the frosting and put it back into the fridge for about an hour. This let the layers set up and sealed the lemon curd inside.

After it was set, I finished frosting the cake and put back into the fridge with plastic wrap draped lightly over the top. About 10 minutes before I served the cake, I pressed the pistachio brittle into the sides of the cake.

Oh one last thing: Cut, serve, and enjoy.

And make the gluten-free birthday girl very VERY happy!

Pin It

LinkWithin

Related Posts with Thumbnails